
Hidden Clogs: Diagnosing Obstructed Dishwasher Inlet Valve
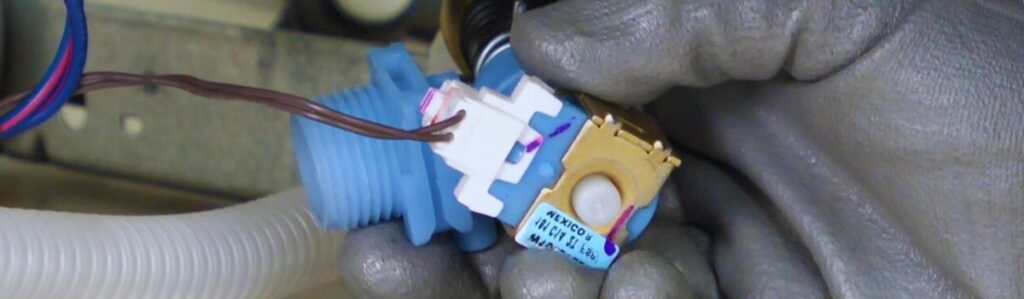
Why the Inlet Valve Matters
Most people don’t think twice about what’s going on inside their dishwasher until their dishes come out crusty or the machine just doesn’t work. One of the least glamorous but critical parts is the inlet valve plus, issues like unclogging a dishwasher using a vacuum can also stem from buildup around this area.
This unassuming component does one thing, but it does it incredibly well:
It lets water into your dishwasher at the right time, in the right amount. That’s it.
No water, no wash.
What the Inlet Valve Does
- When you start a wash cycle, the dishwasher sends an electrical signal to the inlet valve.
- The valve opens briefly to allow water to flow from your supply line into the dishwasher tub.
- Once the right amount of water is in, the valve closes again.
Without that water:
- Your dishes come out half-washed …
- Or, the machine may do nothing at all, sitting in silence or flashing an error.
Signs of a Faulty Inlet Valve
A bad or blocked inlet valve might be behind:
- Dishes that are still dirty after running the cycle
- Long cycle times or cycles that don’t start
- Error codes or strange noises
Common Causes of Inlet Valve Failure
Blockages are often to blame. Common culprits include:
- Mineral deposits
- Grime and food particles
- Sediment from your water supply
These can clog:
- The valve itself
- The tiny mesh screen designed to catch debris
How to Fix It (Sometimes It’s Easy!)
Good news: the fix is often simple.
You may only need:
- A soft brush (like an old toothbrush)
- About 5 – 10 minutes
- A little patience
Quick Cleaning Steps:
- Unplug the dishwasher and shut off the water supply.
- Locate the inlet valve usually behind the lower front panel.
- Remove and inspect the valve and screen.
- Use the brush to gently clean away buildup.
- Reassemble and test your dishwasher.
Symptoms of a Blocked Inlet Valve
If your dishwasher’s acting up, don’t rush to blame the control board or assume the whole thing’s toast. A sneaky clogged inlet valve can cause a stack of headaches and make your machine perform way below par. Here’s what to watch for:
- Low or no water filling
This one’s the big red flag. If your dishwasher’s not filling with water or trickling in way too slowly it’s likely the inlet valve is at fault. It might be partially jammed or fully blocked. - Weird humming sound during water intake
Hear a loud, steady hum when the cycle should be bringing in water? The valve might be trying to open but can’t get the flow it needs. Think of it like a faucet turned on with nothing coming out annoying for you and the machine. - Flashing error codes or indicator lights
Depending on your brand and model, the dishwasher may flash a specific code when it knows something’s off in the water intake department. Check your manual or do a quick search online to decode what your unit’s trying to tell you. - Dirty or soapy dishes after a full cycle
If your plates come out looking like they never went in, a clogged inlet valve might’ve blocked enough water to mess up the rinse and wash cycles. It might still make noise and seem “on,” but no water = no clean dishes. - Spray arms are not doing their job
Water pressure drives those spinning spray arms. If that pressure is weak or inconsistent due to a valve blockage, the arms might barely turn or not at all, turning your dishwasher into more of a dish-resider.
Catch one or more of these signs? It’s time to lift the hood and get real with the inlet valve.
Possible Causes of the Clog
Here’s where things usually go sideways.
First and most common: mineral buildup. If you’ve got hard water and lots of folks do, calcium and magnesium don’t just vanish. They settle into cracks and screens, turning your dishwasher’s inlet valve into a brittle funnel of stone. Over time, that crusty buildup can block water from flowing in at all.
Then there’s debris. Tiny bits of sediment can sneak through the supply line, especially in older houses without a whole-home water filter. It doesn’t take much, just a few grains of sand or rust flakes and suddenly, water’s got nowhere to go.
Speaking of rust, aging pipes are another enemy. Corrosion flakes off over time and follows the water straight into the tiny mesh screen inside your dishwasher valve. It’s not dramatic. It’s just steady and silent, until one day, everything stops working like it should.
Finally, leftover food. Not super common, but possible, especially if you rinsed a particularly nasty pan and that gunk never made it out of the plumbing. It’s rare, but that slimy bit of meatloaf from two nights ago might have taken a detour into the inlet.
At the end of the day, it’s not one big thing; it’s usually a cocktail of small ones.
Diagnosing the Problem
Start by cutting the power either unplug the dishwasher or switch off the circuit breaker. Next, shut off the water supply line. No electricity, no water. You’re in control now.
Access the guts of the machine by removing the bottom front panel, usually held in place with a few screws. You want a clear line of sight to the inlet valve it’s typically mounted low on the front side, right where the water line connects.
Found it? Good. Now inspect the valve:
- Look for a small metal or plastic screen right at the inlet port. That’s your first checkpoint. If it’s covered in gunk, scale, or tiny bits of grit, there’s your smoking gun.
- Check the valve body itself for any cracks, corrosion, or wire terminals that look burnt or loose. A mechanical clog is one thing, but an electrical issue can make the valve act dead even if there’s no debris.
- If the screen looks clean but water still isn’t flowing, the clog could be deeper inside, or the valve might have failed entirely.
This isn’t CSI just you, your flashlight, and basic observation. Most of the time, if the screen’s blocked, clearing it will solve the problem. If not, well… keep going. You’re almost a dishwasher whisperer now.
What You Can Do
Start small: pop out the inlet screen. Most dishwashers have it tucked right where the water line connects to the inlet valve, a tiny mesh, big impact. Rinse it under warm water and lightly scrub away buildup using an old toothbrush or soft-bristled brush. If it’s packed with grit, soak it in vinegar for 20 minutes, then try again.
Got a toothpick or safety pin? Gently poke through any clogged holes, but be careful not to tear or dent the screen. These parts aren’t built like armour, and one careless jab could mean a replacement you didn’t budget for.
Next up, flush the inlet line. Stick a towel or small bowl underneath to catch water, then open the shut-off valve for a second with the line disconnected. You’re checking for weak flow or more debris coming through. If the stream looks good, odds are the clog was local.
Once the screen’s clean and the water flows strongly, reassemble everything back in, valve reconnected, panel closed. Turn the water and power back on. Run a test cycle and listen: no weird humming, consistent filling, and spray arms spinning? You’re back in business.
If Cleaning Doesn’t Fix It
If you’ve cleared the gunk, flushed the line, and your dishwasher still acts like it’s on strike chances are the inlet valve’s toast. Good news: swapping it out is less intimidating than it sounds and doesn’t demand a full toolbelt.
You’ll need a few basics: screwdriver, wrench, towel, and a bucket to catch any rogue drips. The only specialty item is the new inlet valve. Just make sure it matches your dishwasher’s model number Google it or check inside the door frame for the details.
Once you’ve got the gear, here’s how it goes:
- Cut the power at the breaker. Not optional.
- Shut off the water supply unless you like unexpected showers.
- Disconnect the old valve. Remove the mounting screws, unplug the wiring connectors, and detach the hose (have the bucket handy here).
- Install the new valve just like the old one: hose on, wires clipped in, screws tight.
- Before buttoning things back up, check for leaks. Open the water, do a quick cycle test, and keep that towel nearby just in case.
For most folks, this takes around 30 – 45 minutes less if you skip the cursing. It’s a solid DIY win that can bring your dishwasher from “dead weight” back to “kitchen MVP.”
Things Worth Checking While You’re at It
Since you’re already elbow-deep in the guts of your dishwasher, now’s a smart time to run through a few quick checks. These don’t take long, and they could save you from tearing the machine apart again next month.
- Inspect the water inlet hose. Make sure it’s not pinched, bent, or clogged. No water can get to the valve if the hose itself is compromised. Run your fingers along it kinks can happen behind the unit where you won’t spot them unless you’re looking.
- Look at other filters and screens. Some dishwashers have secondary filters, especially near the bottom basin. Pull these out and rinse them clean. Junk buildup there can mess with pressure and water flow, adding to your problems.
- Check the drain hose. Seems unrelated? Not always. If the drain is blocked or they’ve looped it weird during installation, it can cause draining issues that mess with the whole cycle. Make sure it’s clear and routed upward correctly (that high loop really matters).
- Test the float switch. That’s the little bobber inside the tub that tells the dishwasher when it’s full of water. It should move freely up and down with just a nudge. If it’s jammed or stuck, your dishwasher might think it’s full when it’s bone dry.
Think of it like checking your spare tire when you’re already changing one doesn’t take much more effort and could save you from another headache later.
Preventing Future Clogs
Staying ahead of dishwasher clogs is much easier than fixing them after the fact. Regular maintenance and a few small habits can go a long way in keeping everything running smoothly.
Routine Maintenance Tips
Clean the inlet screen/filter regularly
Every few months, take a few minutes to remove and rinse the screen or filter. This prevents debris from quietly building up over time.
Use a cleaning cycle
Run a monthly cycle with either:
- White vinegar, or
- A dishwasher-safe cleaning tablet
This clears out hidden buildup from corners and crevices, keeping water flowing efficiently.
Check hose connections
Inspect the area where the inlet hose meets the valve. If you see signs of:
- Rust
- Sediment buildup
Clean them off to prevent potential clogs later.
Protecting Against Hard Water
If you deal with hard water one of the signs is limescale buildup in your kettle consider installing a water softener. Benefits include:
- Reducing mineral buildup in hoses and valves
- Extending the lifespan of your dishwasher components
- Fewer overall blockages
Timing Matters: Watch Your Water Pressure
Avoid running your dishwasher when household water demand is high, like:
- During showers
- While the laundry machine is running
Low water pressure interrupts flow and encourages sediment buildup.
A little maintenance here and there saves you major headaches later. Stay consistent, and your dishwasher will thank you with reliable, clog-free performance.
Wrapping Up
A clogged inlet valve might not be flashy, but it can bring your whole dishwasher to a halt. It’s one of those small parts that does a simple job, lets water in, but when it fails, nothing works right. The good news? It’s usually not the end of the world.
Most folks can diagnose and fix a blockage with some basic tools, patience, and a flashlight. Whether you clean it out or swap in a new part, you’ll save yourself the cost and hassle of a service call. And if you stay on top of it clean the screen every so often, use rinse aids or vinegar if you’ve got hard water, that inlet valve will keep doing its thing quietly, cycle after cycle.