
Connecting Ice Makers & Water Filters
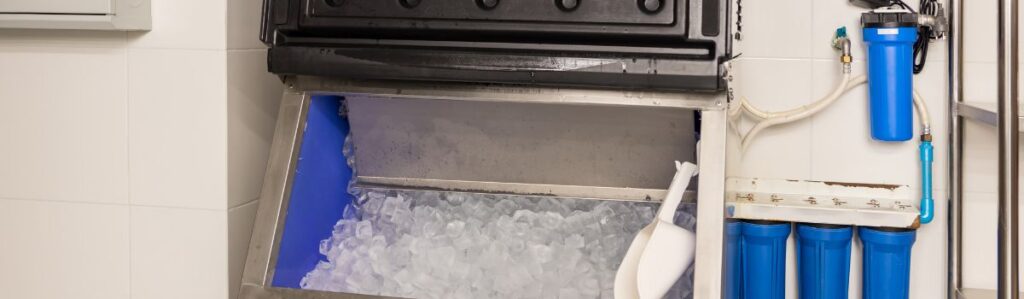
How to Connect Ice Makers and Water Filters the Right Way
Ice makers are one of those kitchen conveniences you don’t think much about until something goes wrong, like cloudy cubes, off-tasting drinks, or even a sluggish machine. The common culprit? Tap water. Even when it’s safe to drink, unfiltered water often carries minerals, chlorine, or sediment that affect both the taste and clarity of your ice and over time, can gum up the works inside your appliance.
That’s where a water filter comes in. Connecting one to your ice maker is a small upgrade with outsized benefits. Better-tasting ice? Check. Longer-lasting appliance? Absolutely. Less internal buildup and fewer mechanical issues down the road? You bet. Whether you’ve got a sleek built-in fridge or a compact under-counter unit, filtering your water is one of the easiest ways to improve performance and protect your investment. Let’s walk through the essentials so you can get it done without the guesswork.
Know Your Setup
Before you start slicing into water lines or shopping for parts, get familiar with what you’re working with. Ice makers come in a few breeds:
First, there’s the fridge-friendly kind that most folks have built into their refrigerator. These pull water in through a small line tucked behind the fridge. Then you’ve got under-counter and standalone models, the kind you’d install in a wet bar or outdoor kitchen. These units might have larger water demands, sometimes require a separate drain, and can experience heating on the sides.
Now, where’s the water coming from? In 99% of cases, your ice maker taps into your home’s cold water supply. Usually, this is a 1/4-inch line that branches off under the sink or directly behind the fridge. It’s small, flexible, and ideal for running to an inline filter.
Speaking of filters here’s what you’re likely to come across:
- Inline filters: These are mounted in line with the existing tubing. They’re the go-to for most home setups, compact, effective, and easy to install.
- Canister filters: Larger, often with better flow and filtration, but take more space. More common in high-use or under-counter setups.
- Reverse osmosis (RO) systems: Overkill for some, but if your water tastes like a swimming pool or is high in minerals, it’s worth considering. Just note RO can slow down water flow, which impacts ice production without a storage tank.
What You Need Before You Start
Before diving in, gather everything you need so you’re not running back and forth to the hardware store mid-project. This part isn’t flashy, but it’ll save you serious headaches later.
Tools: Start with the basics. You’ll need a wrench (adjustable works fine), a tubing cutter (way cleaner than a hacksaw), and some Teflon tape to seal threaded connections. No need for power tools. This is a low-speed, low-pressure install.
Materials: You’ll need a compatible water filter usually an inline model if it’s feeding just your ice maker. Get flexible plastic or copper tubing, depending on what connects well with your current setup. Compression fittings or push-to-connect fittings will tie everything together; what you choose depends on your pipe type and comfort level. (Push-to-connect is great if you’d rather skip the wrench work.)
Location: Plan on mounting the filter close to where the water line feeds the ice maker. You want it accessible for when it’s time to swap out the filter so aim for somewhere you can reach without crawling behind your fridge with a flashlight and a curse on your lips.
Step-by-Step: How to Connect a Water Filter to an Ice Maker
Shut off the water supply
Before touching anything, cut the water. Your ice maker ties into either its own shut-off valve or the main water line find it and close it off. No one wants a surprise leak halfway through.
Cut the water line
Mark the section you want to tap into and make a clean cut using a pipe or tubing cutter. A jagged cut leads to poor connections. This isn’t a race, so make it clean.
Mount the water filter
Pick a solid, accessible spot near the water line. Use the brackets that come with the filter and secure it tight. Too loose, and you’ll end up with leaks or worse, a filter hanging by a thread.
Connect the water line to the filter inlet
Attach the line from your water shut-off to the inlet side of the filter. Depending on your fittings, compression or push-to-connect, get it seated properly, not just hand-tight. A couple of wraps of Teflon tape on threaded connections? Always a good idea.
Connect the filter outlet to the ice maker line
Now run a second line from the other end of the filter to the ice maker’s inlet. Neat is safe keep the tubing straight and clear of sharp bends. Tug each connection lightly to confirm it’s locked in.
Turn the water back on and check for leaks
Slowly open the valve and watch every joint. If anything drips, turn the valve off and retighten. Then, flush the filter a few gallons should do to get rid of any carbon dust or air bubbles.
Check function of ice maker
Listen for the water fill, or better yet, wait for the first batch of ice. If water flows and ice gets made, you nailed it. Warm pat on the back optional but deserved.
Choosing the Right Water Filter
Not all water filters are created equal, and picking the right one matters more than most people think. At a minimum, you want a filter that:
- Improves taste and odor
- Removes chlorine
- Blocks sediment, scale, and other gunk from getting into your ice
From there, your ideal filter depends on your setup and what’s in your water.
Step 1: Choose Between Filter Types
Inline Filters
- Compact and easy to install directly into the water line
- Suitable for most ice makers
- Minimal cost and maintenance
- Ideal for improving taste and blocking common impurities
Reverse Osmosis (RO) Systems
- Offer deeper filtration for hard or heavily chlorinated water
- Remove more contaminants for higher water quality
- More complex: higher cost and maintenance
- Recommended if your water often rates poorly in quality tests
Step 2: Understand Filter Specs
Look closely at two key features:
Micron Rating
- Indicates the size of particles filtered out
- Lower number = finer filtration
- For clear, clean ice: 1- 5 microns is ideal
Certifications
NSF/ANSI standards help verify filter effectiveness
- NSF 42: Reduces chlorine, improves taste and odor
- NSF 53: Filters out a broader range of contaminants
Trust certifications over marketing hype
Step 3: Don’t Forget Maintenance
Even the best filter won’t last forever. Keep these tips in mind:
- Change every 6 months (for most inline filters)
- Choose filters that are easy to access and replace
- When installing, leave extra tubing length to avoid a tight fit later
- If your water smells like a pool or leaves film on glassware, get a filter designed to handle those specific concerns
Common Mistakes to Avoid
A water filter’s only as good as how you install it. Here are the usual suspects when things go sideways:
Skipping the flush step after installation
You wouldn’t drink the first water out of a fresh garden hose same goes for a new filter. Most units need to be flushed with several gallons before they’re ready for action. If you skip this, expect cloudy cubes and a weird taste.
Overtightening fittings
Too tight isn’t better it’s broken waiting to happen. Cranking down on plastic threads or small fittings can lead to cracks or stripped parts. Tighten enough to seal, not to lock down Fort Knox.
Installing the filter backward
Filters have a “flow” direction. It’s usually marked with an arrow. Hooking it up the wrong way jams your water pressure and makes the filter basically useless. Take three extra seconds check the label.
Not leaving enough tubing slack for removal or service
Filters need replacing. If you’ve lined everything up like a game of Tetris, you’re going to have a bad time when that day comes. Leave a little extra tubing and space so you can swap it out without tearing everything apart.
Avoid these, and your filter will do what it’s built for: clean water, clean ice, no headaches.
Keeping It Working Like It Should
Hooking up a water filter is only half the job keeping it performing day in and day out is where the real payoff comes. Regular maintenance may not be exciting, but it’s essential for reliable, clean water and clear ice.
1. Replace Your Filter on Schedule
Most filters need to be changed every 6 months, but how often you replace them depends on two main factors:
- Water quality
- Water usage volume
Pro Tip:
Don’t just guess when it’s time to replace the filter:
- Use a Sharpie to write the install date right on the filter housing
- Or, set a calendar reminder on your phone to stay on track
2. Check for Leaks
Especially during the first couple of weeks after installation, do a routine visual inspection:
- Look for drips around fittings and tubing
- Pay attention to damp cabinet floors or subtle discoloration
- Remember, even a small leak can cause major damage over time
3. Watch for Performance Clues
Your fridge has ways of letting you know something’s off. Be alert for:
- Slow ice production
- Smaller-than-normal ice cubes
These symptoms can be signs of:
- A clogged or aging filter
- Water pressure issues
Either way, don’t ignore the signs addressing them early keeps the system running smoothly.
4. Inspect the Tubing
Over time, plastic tubing can degrade. Give it an occasional once-over and look for:
- Cracks
- Discoloration
- Brittleness or stiffness
Fix:
Replace any questionable tubing; it’s inexpensive and only takes a few minutes. Think of it as cheap insurance.
Regular upkeep isn’t glamorous, but it’s what keeps your filtered water flowing reliably and your ice cold, clear, and clean.
Wrapping Up
Connecting a water filter to your ice maker doesn’t require a plumber’s license or a day off work; it just takes the right tools, a bit of patience, and a solid plan. If you followed the steps, you’re now set up with better-tasting ice, cleaner water, and fewer worries about scaling or sediment gumming up your machine.
It’s easy to skip the filter and hope for the best, but investing thirty minutes now saves you from maintenance headaches down the line. And let’s be honest, ice that tastes like your basement tap isn’t impressing anyone.
Just remember, the job isn’t over once the filter’s in place. Mark your calendar for the next filter change, keep an eye on your connections, and make it a habit to check on things periodically. Your ice maker and anyone who drinks from it will thank you.