
Repairing a Broken Dryer Belt
What the Dryer Belt Does
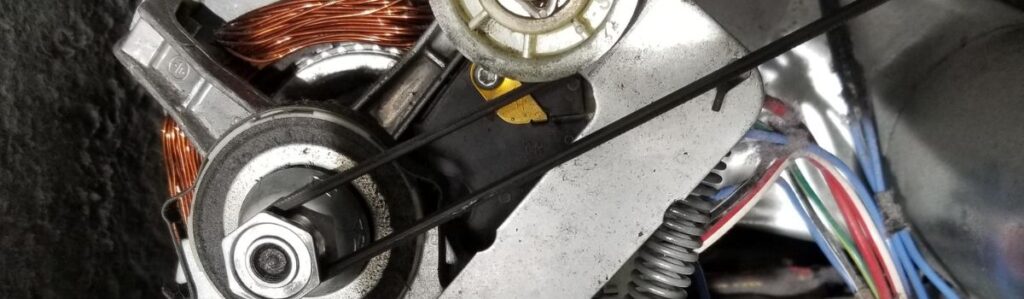
The dryer belt is a no-frills, load-bearing lifeline. It’s a thin rubber loop that wraps around both the dryer drum and the motor pulley. When the motor turns, it forces the belt to rotate the drum. No belt, no spin. Simple as that.
Over time, like any working part, the belt takes a beating. Every full load, every heavy towel, wears it down just a little. Add in heat, age, and the occasional overstuffed drum, and eventually snap. When it breaks, the motor still hums along, but the drum just sits there, not doing a thing. That’s your sign. It’s time to get your hands dirty – even more important when handling maintenance for commercial laundry businesses.
Signs the Belt Might Be Broken
Before you start grabbing tools, it’s good to know if your dryer belt is actually the culprit.
The first big clue: your dryer powers on, lights up, maybe even gets warm but the drum doesn’t spin. That usually points to a belt issue. Another red flag is a low humming sound when you press start. The motor is still trying to do its job, but the belt isn’t around to help.
A worn belt might also lead to thudding or a burning smell kind of like rubber on metal. Not something you want to ignore. And here’s a quick hands-on check: open the door and give the drum a push. If it spins too freely with barely any resistance, the belt’s either snapped or hanging loose.
Safety First
Before you do anything else, unplug the dryer. That’s non-negotiable. Even if nothing’s moving, the electrical parts are very much alive, and you don’t want to find out the hard way.
If it’s a gas dryer, shut off the gas valve too. You’re not messing with the lines directly, but better safe than dealing with a leak or worse.
Finally, clear your space. You’ll need room in front of the dryer to open it up and move around. Grab a flashlight. Maybe some gloves. And don’t work in flip-flops respect the machinery.
Tools and Materials You’ll Need
Before you start tearing into your dryer like it owes you money, get your tools together. The last thing you want is to realize halfway through the job that you’re missing something simple (like the right screwdriver). Here’s what you should have on hand:
Essential Tools
- Replacement Dryer Belt
Make sure to get one that matches your dryer model exactly.
Tip: Check the model number usually found behind the door or on the back panel then match it when ordering online or at the hardware store. - Screwdriver or Nut Driver
Most dryers use either Phillips screws or 1/4″ hex-head screws.
Tip: Figure out which type your model uses and have the appropriate tool ready.
Helpful Add-ons
- Socket Wrench (optional but helpful)
Some screws, especially around the motor or idler pulley, can be tough to reach.
A socket wrench can make the job faster and easier. - Putty Knife
It may sound odd, but it’s perfect for popping off the top panel in many dryers.
Slide it into the seam near the front and push gently most panels will unclasp easily. - Vacuum or Brush
While you’re inside the machine, take the opportunity to clean it out.
Built-up lint can cause overheating or even start fires, so a quick clean is worth the effort.
That’s it no need for a full mechanic’s garage. Just the basics and a little patience will do the job right.
Getting Inside the Dryer
Working on your dryer can seem intimidating, but with a few tools and some patience, you can safely access the interior. Follow these steps to get started:
Remove the Lint Trap
- Start by pulling out the lint trap.
- Look for screws hidden in the lint trap housing.
- Use a screwdriver to remove them. These usually hold the top panel in place.
Release the Top Panel
- Grab a putty knife and slide it under the front corners of the top panel.
- Feel for resistance this is from the metal clips holding it down.
- Press inward on the clips and carefully lift the panel.
Tip: Don’t be afraid to use a little force, but avoid bending the metal.
Locate and Remove Front Panel Screws
- With the top panel lifted like a car hood, look inside for the front panel screws.
- These may be: At the top corners of the front panel and along the interior edges
- Use a screwdriver or nut driver to remove them.
Disconnect the Door Switch Wires
- As the front panel starts to come loose, pause it may still be connected by door switch wires.
- Peek behind the panel and carefully: Locate the wires, and slide them off their terminals
Pro Tip: Take a quick photo of the connections for easy reconnection later.
5. Remove the Front Panel
- Lift the loosened front panel off the dryer.
- Set it aside in a safe place.
Releasing the Old Belt
This part might feel like you’re poking around in a metal puzzle box, but it’s straightforward if you know what you’re looking at. If the old belt is still hanging on somehow, gently slide it off the idler pulley that’s the little wheel keeping tension and the motor shaft. It’s usually a snug fit, so expect a bit of maneuvering. If the belt has snapped completely, you’ll probably find rubber shrapnel wrapped around parts of the system remove every last piece. You don’t want old belt bits jamming up your shiny new one.
Now’s the perfect time to eyeball the idler pulley and motor pulley. Spin them with your fingers. If they grind, squeak, or wobble, they might be part of the problem, not just innocent bystanders. Replace any worn parts now, before you put everything back together and end up tearing into it again next week.
Install the New Dryer Belt
Now that the old belt’s out of the way, it’s time to get the new one in. Start by looping the replacement belt around the drum, making sure the grooved side is against the drum itself that grip is what helps it turn. Don’t worry if it feels a little snug, that’s a good thing.
Next comes the trickiest part: threading the belt through the idler pulley and then onto the motor shaft. You’ll likely need to reach under the drum to do this, so get ready to work by feel. The idler pulley is spring-loaded and needs to be pushed to relieve tension hold it aside with one hand while slipping the belt onto the motor shaft with the other.
Once it’s in place, make sure the belt is lined up straight and centered. No twists. No slack. Give the drum a few slow turns by hand. It should move freely but with some resistance from the tensioned belt.
If it all checks out, you’re ready to start putting things back together.
Reassembly
Time to button this thing back up. Start by reconnecting the door switch wires you unplugged earlier don’t forget this step or your dryer won’t even think about turning on. The connectors are usually color-coded or shaped so they only go one way.
Next, slide the front panel into position. It helps to angle the bottom in first, then push the top flush. Once it’s lined up, reinsert and tighten the screws you pulled earlier.
Lower the top panel back down. You should feel it snap or lock into place if you’re aligning it right. Replace any screws near the lint trap housing, if your model uses them.
Once everything’s secure, plug the dryer back in. If it’s a gas dryer, turn the gas valve back on. Take a step back, admire your work for about half a second, and get ready to put it to the test.
Test Run
Once your dryer is reassembled, it’s time for the moment of truth. Follow these steps to make sure everything is running smoothly.
Power On
- Plug the dryer back in.
- Set it to a low-heat or air-only cycle.
- Close the door and press start.
You should:
- Hear the hum of the motor.
- See and feel the drum turning smoothly.
Listen Carefully
Stay nearby for the first minute or two. Be on alert for any unusual noises:
- Scraping
- Squeaking
- Any sound that doesn’t feel confident or smooth
If it runs quiet and steady, great job you nailed the repair.
If not, unplug the dryer immediately and inspect:
- Is the belt misaligned?
- Is the idler pulley seated properly?
Wrapping It Up
Swapping out a busted dryer belt isn’t rocket science it just takes a steady hand, a little time, and the right part. If you followed the steps and the drum’s spinning again, give yourself a high-five. Not just for fixing it, but for dodging a service call that could’ve run you triple what the belt cost.
Now, if the dryer still won’t turn after all this, it might be a deeper issue think motor burnout or a seized pulley. That’s the time to either dig deeper or make the call.